Taking stunning portraits is more than just having a quality camera and an attractive subject. It’s about understanding the importance of lighting and how it can make or break your shot. Whether you’re a beginner or an experienced photographer, mastering portrait lighting setups is crucial for capturing captivating portraits. In this comprehensive guide, we’ll explore different lighting patterns and techniques that will help you create stunning portraits every time.
Table of Contents
- Butterfly Lighting
- Loop Lighting
- Rembrandt Lighting
- Split Lighting
- Broad and Short Lighting
- Rim and Profile Lighting
- Fill Lighting
1. Portrait Lighting Fundamentals
Before diving into specific lighting patterns and setups, it’s important to understand the fundamentals of portrait lighting. Whether you’re shooting in a studio or at home, these principles will help you achieve the desired lighting effect.
Portrait lighting can be achieved with a minimal budget, and you don’t necessarily need expensive equipment. One photographer, for example, demonstrates how to build a lighting setup on a budget. With some creativity and the right knowledge, you can achieve professional-looking results.
2. Key Light Patterns
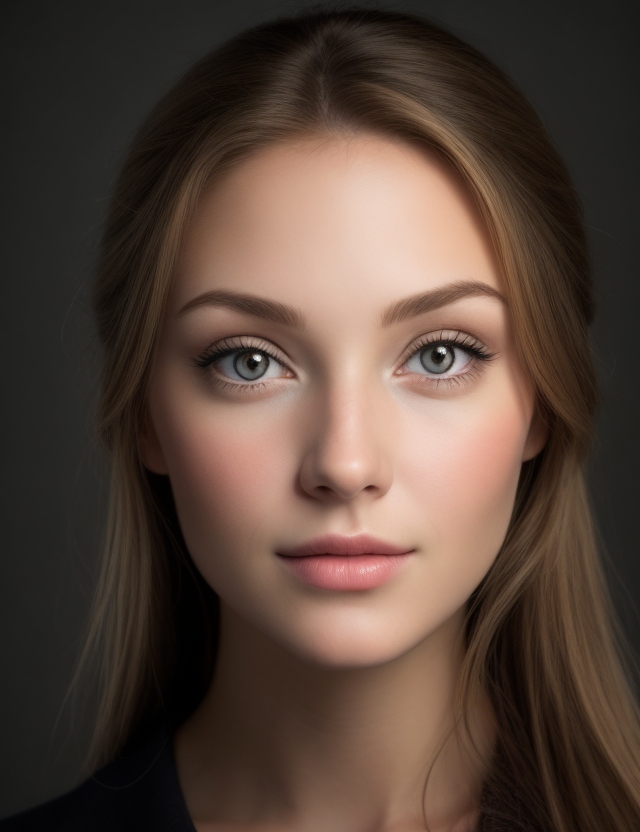
Lighting patterns play a crucial role in portrait photography. These patterns determine how light interacts with the subject’s facial features, creating areas of light and shadow. The shape of the shadow cast on the face distinguishes different lighting patterns. Let’s explore some common key light patterns used in portrait photography.
– Butterfly Lighting
Butterfly lighting is named after the butterfly-shaped shadow it creates under the subject’s nose. To achieve this lighting pattern, place the light source above and directly behind the camera, slightly pointing it down towards the subject. The angle of the light determines the intensity of the shadows. The higher the angle, the more pronounced the shadows become.

Butterfly lighting is commonly used in fashion portraits and can minimize the appearance of wrinkles. The light coming from above creates additional shadows under the model’s chin and around the cheeks. However, the presence of light in front of the model balances out the shadows, resulting in a more even look.
– Loop Lighting
Loop lighting is similar to butterfly lighting but creates a small shadow of the nose on one side of the face, forming a loop-shaped shadow. To achieve this effect, position the light just above eye level of the model and tilt it at a 45-degree angle. Experiment with the angle to achieve the desired loop shape, as every face structure is unique.

Loop lighting is commonly used in standard headshots and can create a flattering and natural look. By slightly moving the light from the butterfly lighting position, a nose shadow is cast on the opposite side, resulting in a loop-shaped shadow.
– Rembrandt Lighting
Rembrandt lighting is named after the famous Dutch painter who often used this lighting style in his portraits. It involves placing the light higher and a little further off the axis at a steeper angle. The characteristic feature of Rembrandt lighting is the long shadow loop of the nose connecting with the shadow on the cheek, creating a triangle-shaped light on the cheek.

To achieve Rembrandt lighting, turn the subject’s face away from the light source, making one side of the face lit and the other side in shadow. The light should peak over the bridge of the nose to cast light on the cheek, creating the signature triangle-shaped light.
– Split Lighting
Split lighting creates a dramatic effect by illuminating only half of the face while leaving the other half in shadow. It involves placing the light source at a 90-degree angle to one side of the subject’s face. This lighting pattern creates a striking contrast between light and shadow, resulting in a bold and dynamic portrait.

To soften the dramatic effect of split lighting, you can add a reflector or bounce light onto the shadowed side of the face. This technique helps balance out the light and create a more even look.
– Broad and Short Lighting
Broad and short lighting refer to the direction in which the light illuminates the subject’s face. Broad lighting illuminates the side of the face that is turned away from the camera, while short lighting illuminates the side of the face that is turned towards the camera.

Broad lighting is ideal for creating a softer and more natural look, while short lighting creates a more dramatic effect. Experiment with both lighting setups to achieve the desired mood and style for your portraits.
– Rim and Profile Lighting
Rim lighting creates a halo effect around the subject by illuminating them from behind. It results in a striking and dramatic look, especially when shooting sports or action photography. To achieve rim lighting, place the light right behind the subject. However, keep in mind that the subject may appear underexposed, so additional lighting may be required to properly expose them.

An offshoot of rim lighting is profile lighting, where only the subject’s profile is captured. This technique involves lighting only the edge of the subject’s profile, usually by placing the light in front of their face right above eye level.
– Fill Lighting
Fill lighting is used to expose the details of a subject that may be hidden in the shadows created by the key light. It acts as a secondary light source in the three-point lighting setup. Fill lighting is especially useful when one light source is not sufficient to properly expose the subject.

The fill light can be a second light source or a reflector that bounces light from the key light onto the subject. The ratio between the key light and the fill light determines the overall contrast in the image. A larger ratio creates a more dramatic and contrasted look, while a smaller ratio produces a more even and balanced result.
3. Portrait Lighting Setups
Now that we’ve explored different lighting patterns, let’s delve into the actual portrait lighting setups used in studio photography. These setups can help you achieve specific lighting effects and enhance the mood and style of your portraits.
– Studio Lighting Setup
Studio lighting setups offer a controlled environment that allows for precise lighting control. With the right equipment and knowledge, you can create stunning portraits in a studio setting. Here are some common studio lighting setups:
– Butterfly Lighting Setup
Butterfly lighting is a classic and versatile setup that works well for a variety of portraits. To achieve this setup, place the key light above and directly behind the camera, slightly angled downwards. This lighting position creates a butterfly-shaped shadow under the nose, hence the name.
– Loop Lighting Setup
Loop lighting is similar to butterfly lighting but adds a small shadow of the nose on one side of the face. To achieve this setup, move the key light slightly to the side while maintaining a similar angle. This will create a loop-shaped shadow under the nose.
– Rembrandt Lighting Setup
Rembrandt lighting creates a dramatic effect by illuminating one side of the face and leaving the other side in shadow. To achieve this setup, position the key light higher and a little further off the axis, creating a steeper angle. This will cast a triangular-shaped light on the cheek, connecting with the shadow loop of the nose.
– Split Lighting Setup
Split lighting creates a bold and dramatic effect by illuminating only half of the face, leaving the other half in shadow. To achieve this setup, position the key light at a 90-degree angle to one side of the subject’s face. This will create a striking contrast between light and shadow.
– Broad and Short Lighting Setup
Broad and short lighting setups create different looks by illuminating different sides of the face. Broad lighting illuminates the side of the face turned away from the camera, while short lighting illuminates the side turned towards the camera. These setups are ideal for creating different moods and emphasizing specific facial features.
– Rim and Profile Lighting Setup
Rim lighting is a dynamic lighting setup that creates a halo effect around the subject, emphasizing their hair and shoulders. To achieve this setup, place the light source behind the subject, slightly above them. This will create a rim of light around the subject, separating them from the background.
Profile lighting is a variation of rim lighting where only the subject’s profile is captured. This setup involves lighting only the edge of the subject’s profile, usually by placing the light in front of their face right above eye level.
– DIY Lighting Setup
Not everyone has access to a professional studio setup, but that shouldn’t stop you from creating stunning portraits. With some creativity and resourcefulness, you can achieve great results using everyday objects and materials. Here are some DIY lighting tips for portrait photography:
– Natural Lighting
One of the simplest and most accessible lighting sources is natural light. Utilize windows and doors to let in natural light and create beautiful, soft lighting for your portraits. You can also use curtains or blinds to control the intensity and direction of the light.
– Reflectors
If you need to fill in shadows or redirect light, reflectors can be your best friend. Reflectors can be made from various materials such as white foam boards, aluminum foil, or white sheets. Experiment with different sizes and angles to achieve the desired lighting effect.
– Light Diffusion
To soften harsh lighting, you can use DIY light diffusers made from materials like white shower curtains, thin fabrics, or even parchment paper. Place the diffuser between the light source and the subject to create a softer, more flattering light.
– Outdoor Lighting Setup
Outdoor portrait photography offers unique opportunities to capture stunning natural light and scenic backgrounds. Here are some tips for achieving great outdoor lighting for your portraits:
– Golden Hour
The golden hour, which occurs shortly after sunrise or before sunset, is the ideal time for outdoor portrait photography. The soft, warm light during this time of day creates a magical and flattering atmosphere for your subjects.
– Shade
If the sun is too harsh or creating unflattering shadows, look for shaded areas such as under trees or buildings. These areas provide softer and more even lighting, making it easier to capture beautiful portraits.
– Use Reflectors
Reflectors can be especially useful in outdoor settings to fill in shadows or redirect light. They can help balance the lighting and create a more even look in your portraits.
4. Tips and Techniques
In addition to understanding different lighting patterns and setups, there are several tips and techniques that can elevate your portrait photography. Here are some additional considerations to keep in mind:
– Using Reflectors
Reflectors are versatile tools that can enhance your portrait lighting. They can be used to fill in shadows, redirect light, or create catchlights in the subject’s eyes. Experiment with different reflector sizes and materials to achieve the desired effect.
– Choosing the Right Background
The background plays an important role in portrait photography. It should complement the subject and enhance the overall composition of the image. Consider using a simple and uncluttered background to keep the focus on the subject. Alternatively, experiment with different textures and patterns to add visual interest to your portraits.
– Using Shallow Depth of Field
Shallow depth of field can create a beautiful and artistic effect in portrait photography. By using a wide aperture (low f-stop number), you can blur the background and draw attention to the subject. This technique can help create a sense of depth and separation between the subject and the background.
5. Conclusion
Mastering the art of portrait lighting setups is essential for capturing captivating and professional-looking portraits. Whether you’re shooting in a studio or in an outdoor setting, understanding different lighting patterns and setups will help you create stunning images that stand out. Experiment with various techniques, reflectors, and backgrounds to add your own creative touch to your portraits. With practice and a solid understanding of portrait lighting, you’ll be able to consistently capture beautiful and impactful portraits.