In photography, captu ring the perfect shot requires attention to detail and an understanding of the interplay between light and subject. Among the various factors that contribute to a successful photograph, proper illumination of the subject in a photographic studio stands out as an essential element. This article explores the significance of illuminating the subject correctly and how it can elevate the quality and impact of our studio photography.
Here lighting goes beyond mere brightness. It plays a pivotal role in setting the mood and enhancing the visual impact of the subject. By skilfully manipulating light sources, angles, and intensities, we can create a wide range of effects, evoking different emotions and captivating the viewer.
Correctly illuminating the subject can make a remarkable difference in the final photograph. It helps to eliminate unwanted shadows, accentuate details, and reveal the true essence of the subject. Whether it’s highlighting the texture of an object or sculpting the features of a model, proper lighting techniques bring out the subject’s inherent beauty and intricacies.
One of the distinct advantages of working in a photographic studio is the ability to exercise complete control over the lighting environment. By utilizing various lighting tools and techniques, we can exercise our creative vision and achieve desired artistic outcomes.
The Background
When taking photographs in a photographic studio we often want to separate the subject from the background, the main reason being to draw attention to the subject. When the subject is clearly separated from the background it is easier for the viewer to focus on it. This is especially important in portrait photography, where you want the viewer to be drawn to the subject’s face. The background can also help to create a certain mood or atmosphere in the image. By using different lighting techniques, you can create shadows and highlights that help to separate the subject from the background.
There is a basic rule of thumb that says photograph a light subject on a dark background and a dark subject on a light one. This is useful for separating the background and subject without any lighting, but for artist reason and often out of necessity it is guidance that is regularly ignored. Below are three lighting techniques to help separate the subject from the background: –
• Back lighting
• Rim lighting
• Hair lighting.
Back light

A backlight in a photographic studio is a light source that is positioned behind the subject. This can be done with a variety of lights, including soft-boxes, umbrellas, and reflectors. Backlighting can be used to create a variety of effects, including:
Backlighting can create a dramatic contrast between the subject and the background. This can be especially effective when shooting outdoor portraits.
It can help to emphasize the subject by creating a halo of light around them. This can be a great way to make the subject stand out from the background.
This lighting can help to create a sense of depth in a photograph. This is because the light from the backlight will fall off behind the subject, creating a shadow that helps to define their shape.
To use backlight effectively in a studio, it is important to consider the following factors:
The backlight should be positioned directly behind the subject, or slightly to the side. This will help to create the desired dramatic effect.
The intensity of the light: The intensity of the backlight will affect the amount of contrast in the photograph. A brighter backlight will create more contrast, while a dimmer backlight will create less contrast.
The colour of the backlight can also affect the overall look of the photograph. A white backlight will create a more natural look, while a coloured backlight can add a touch of drama or creativity.
Rim lighting

Rim lighting is a lighting technique that uses a light source to illuminate the edges of a subject, creating a halo effect. This type of lighting can be used to create a variety of effects. It can create a dramatic and mysterious effect by silhouetting the subject against a dark background. it is also used to emphasize the subject by creating a sense of separation between them and the background.
Rim lighting can help to create a sense of depth in an image by creating a shadow behind the subject. This can help to make the subject look more three-dimensional.
The rim light should be positioned behind the subject and slightly to the side. This will help to create the desired halo effect.
The intensity of the rim light will affect the amount of halo effect that is created. A brighter rim light will create a more pronounced halo effect, while a dimmer rim light will create a less pronounced halo effect. Its colour can also affect the overall look of the image. A white rim light will create a more natural look, while a coloured rim light can add a touch of drama or creativity.
Rim lighting is often used in portrait photography to create a dramatic and mysterious effect.
It can be used in product photography to help to separate the product from the background and create a sense of depth.
Fashion photography often uses Rim lighting to create a dramatic and edgy look.
Rim lighting is a versatile lighting technique that can be used to create a variety of effects.
Hair lighting

A hair light is a light source that is used to illuminate the hair of a subject in a photographic studio. It is typically positioned behind the subject and slightly above their head and is angled down to create a halo of light around their hair. Hair lights are used for a variety of reasons such as to create a halo effect. This is when a single light is used to create a halo effect around the subject’s hair, which can help to make them stand out from the background by creating a clear distinction between the two. This can be especially helpful when the subject is wearing a dark-coloured shirt or dress. A hair light can help to add depth to an image by creating a shadow behind the subject’s hair. This can help to make the subject look more three-dimensional.
To use a hair light effectively in a studio, it is important to consider the following factors:
The hair light should be positioned behind the subject and slightly above their head. This will help to create the desired halo effect.
The intensity of the hair light will affect the amount of halo effect that is created. A brighter hair light will create a more pronounced halo effect, while a dimmer hair light will create a less pronounced halo effect.
The colour of the hair light can also affect the overall look of the image. A white hair light will create a more natural look, while a coloured hair light can add a touch of drama or creativity.
The subject
Proper  illumination enables us to control the direction and quality of light falling on the subject. This control allows for the shaping of the subject’s features, emphasizing textures, and creating a three-dimensional effect. With the careful placement and adjustment of light sources, we can achieve dramatic or soft lighting, thereby altering the overall mood and atmosphere of the image. In addition to creative expression, correct illumination in a photographic studio ensures consistency and professionalism in the resulting images. This is particularly crucial in commercial photography, where product shots need to be uniform, accurate, and visually appealing. Lighting techniques in a photographic studio possess the power to evoke specific moods and emotions. The strategic use of light can transform a simple portrait into a captivating representation, evoking joy, mystery, or drama. It serves as a means of conveying the intended message and engaging the viewer on an emotional level. Different genres of photography benefit from appropriate lighting setups. Whether it’s a bright and cheerful ambiance for product advertisements or a moody and dramatic setting for artistic portraits, lighting helps create an atmosphere that aligns with the desired narrative and aesthetic. Understanding some basic lighting setups and their effects allows us the ability to be consistent when we need to be and acts as the foundations when we want to move to more experimental or artist lighting setups. Below are a number of lighting setups. they consist of:-
• 1:1 lighting
• 1:2 lighting
• Rembrandt lightning
• Clam lighting
• Short lighting
• Broad lighting
• Split lighting
• Hollywood lighting
• Butterfly lighting
1:1 lighting

1:1 lighting is often used in beauty photography to create a flawless look. The even lighting helps to minimize blemishes and wrinkles, and the lack of contrast helps to create a smooth, even skin tone.
The flat lighting helps to focus attention on the subject’s face and features, and the lack of contrast helps to create a clean, uncluttered look. It is also a popular choice for fashion photography. The even lighting helps to showcase the details of the clothing, and the lack of contrast helps to create a modern, minimalist look.
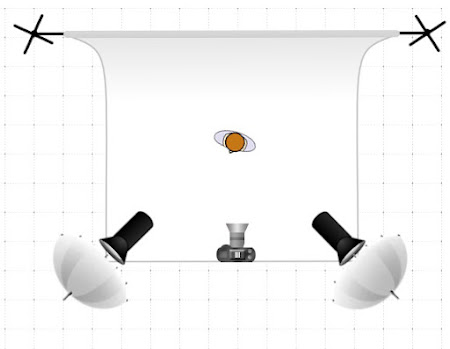
To achieve 1:1 lighting in a studio, you will need two light sources of equal intensity. These can be any type of light source, such as strobes, speedlights, or continuous lights. The light sources should be positioned on either side of the subject, at the same height and distance from the subject. The light sources should also be aimed at the subject’s face at the same angle.
Once the light sources are positioned, you will need to adjust the intensity of the light sources until they are equal. You can do this by adjusting the power output of the light sources, or by using a light meter to measure the intensity of the light.
Once the light sources are equal in intensity, you will have achieved 1:1 lighting. You can then experiment with different settings to see what works best for your subject and your desired look.
1:2 Lighting

1:2 is a technique that creates contrast in the lighting and shadows. The contrast can help to showcase the details of the clothing, and the dramatic look can help to create a high-fashion, edgy look. It can also be used for product photography. The contrast can help to highlight the product’s features, and the dramatic look can help to create a more visually appealing image. To achieve 1:2 lighting in a studio, you will need two light sources of unequal intensity. The key light should be twice as intense as the fill light. These can be any type of light source, such as strobes, speedlights, or continuous lights. The key light should be positioned on one side of the subject, at the same height and distance from the subject. The fill light should be positioned on the opposite side of the subject, at the same height and distance from the subject. The key light should also be aimed at the subject’s face at a slightly different angle than the fill light.
Once the light sources are positioned, you will need to adjust the intensity of the light sources until they are in the correct ratio. You can do this by adjusting the power output of the light sources, or by using a light meter to measure the intensity of the light.
Once the light sources are in the correct ratio, you will have achieved 1:2 lighting. You can then experiment with different settings to see what works best for your subject and your desired look.
Here are some additional tips for using 1:2 lighting in a studio:
Use a diffuser to soften the light and create a more natural look.
Use a reflector to bounce some of the light back onto the subject’s face, which will help to fill in the shadows.
Experiment with different angles and positions for the light sources to see what works best for your subject.
Use a slower shutter speed to allow more light into the camera, which will help to capture the details of the light.
Rembrandt lightning

Rembrandt lighting can create a dramatic and moody look. The triangle of light under the eye can help to create a sense of depth and interest. This lighting style is also a popular choice for classical portraits. The soft shadows and the triangle of light can help to create a timeless and elegant look. The contrast can help to highlight the details of the clothing, and the dramatic look can help to create a high-fashion, edgy look, when used for fashion photography.
To achieve Rembrandt lighting in a studio, you will need a key light, a fill light, and a reflector. The key light should be positioned high and to one side of the subject. The fill light should be positioned on the opposite side of the subject, at a slightly lower intensity than the key light. The reflector should be positioned on the shadow side of the subject, to help fill in the shadows.
Once the light sources are positioned, you will need to adjust the intensity of the light sources until you achieve the desired look. You can do this by adjusting the power output of the light sources, or by using a light meter to measure the intensity of the light.
Once you have achieved the desired look, you can experiment with different settings to see what works best for your subject.
Clam lighting
Clamshell lighting is a two-light lighting setup that is often used in portrait photography. It is named for the way the two lights are positioned, which resembles the shape of a clamshell. The key light is placed above the subject and angled down at a 45-degree angle. This light is the main light source and provides the majority of the illumination for the portrait. The fill light is placed below the subject and angled up at a 45-degree angle. This light helps to fill in the shadows created by the key light and creates a more balanced exposure.
Clamshell lighting is a versatile lighting setup that can be used to create a variety of looks. It is a good choice for beauty photography, as it can help to create a soft, flattering light. It can also be used for portrait photography, headshots, and other types of photography.
Here are the steps on how to set up clamshell lighting:
Choose your light sources. You can use any type of light source for clamshell lighting, but a beauty dish or softbox is a good option for creating a soft, flattering light.
Position the key light.
The key light should be placed above the subject and angled down at a 45-degree angle. The light should be positioned so that it falls on the subject’s face from the front and slightly above.
Position the fill light.
The fill light should be placed below the subject and angled up at a 45-degree angle. The light should be positioned so that it fills in the shadows created by the key light.
Adjust the lights. Once the lights are positioned, you may need to adjust the intensity of the lights or the angle of the lights to achieve the desired look.
Short lighting

Short lighting uses a single light source to create a high-contrast effect on the subject’s face. The light source is positioned at a 45-degree angle to the subject’s face, and it illuminates the side of the face that is turned away from the camera. This creates a shadow on the side of the face that is facing the camera, which emphasizes the facial features on the shadowed side. Short lighting is often used in portrait photography to create a dramatic or sophisticated look. It can also be used to slim down a wider face or to accentuate the cheekbones.
Some of the benefits of using short lighting
It creates a high-contrast effect that can be very dramatic or sophisticated.
It can slim down a wider face or accentuate the cheekbones.
It can be used to create a variety of looks, from casual to formal.
Some of the drawbacks of using short lighting
It can be unflattering for some people, especially those with round or chubby faces.
It can be difficult to use in outdoor settings, as the light source may be too harsh.
It can be difficult to use with multiple subjects, as the shadows may not fall in the same place on each person.
Overall, short lighting is a versatile lighting technique that can be used to create a variety of looks. It is important to experiment with different angles and positions of the light source to find what works best for your subject and the desired effect.
Broad lighting

Broad lighting uses a single light source to create a more even and flattering effect on the subject’s face. The light source is positioned directly in front of the subject, or slightly to the side, and it illuminates the side of the face that is facing the camera. This creates a shadow on the side of the face that is turned away from the camera, but the shadow is not as deep as it would be with short lighting. Broad lighting is often used in portrait photography to create a soft and natural look. It can also be used to make a subject’s face appear wider or to minimize any facial flaws.
Benefits of using broad lighting.
It creates a soft and natural look that is flattering for most people.
It can make a subject’s face appear wider or to minimize any facial flaws.
It is easy to use and can be done with a single light source.
Drawbacks of using broad lighting.
It can be less dramatic than other lighting techniques, such as short lighting.
It can make a subject’s face appear flat or two-dimensional.
It can be difficult to use in outdoor settings, as the light source may not be strong enough.
Split lighting

Split lighting is a lighting technique that uses a single light source to create a strong contrast between light and shadow on the subject’s face. The light source is positioned at a 90-degree angle to the subject’s face, and it illuminates one side of the face while leaving the other side in shadow. This creates a sharp line of demarcation between the light and shadow sides of the face, which can be used to create a dramatic or edgy look. Split lighting is often used in portrait photography to create a sense of mystery or intrigue. It can also be used to emphasize the facial features on the shadowed side of the face. Use a reflector to bounce light back onto the shadow side of the face if you want to fill the shadows and give a slightly different effect.
Benefits of using split lighting:
It creates a strong contrast that can be very dramatic or edgy.
It can emphasize the facial features on the shadowed side of the face.
It can be used to create a variety of looks, from casual to formal.
Drawbacks of using split lighting:
It can be unflattering for some people, especially those with round or chubby faces.
It can be difficult to use in outdoor settings, as the light source may be too harsh.
It can be difficult to use with multiple subjects, as the shadows may not fall in the same place on each person.
Hollywood lighting

Hollywood lighting is a style of lighting that is often used in film and photography. It is characterized by its high contrast, with strong shadows and highlights. This style of lighting can be used to create a variety of moods, from dramatic to romantic.
Hollywood lighting is typically created using three light sources: the key light, the fill light, and the back light. The key light is the main light source, and it is typically positioned at a 45-degree angle to the subject’s face. The fill light is used to fill in the shadows created by the key light, and it is typically positioned opposite the key light. The back light is used to create a rim of light around the subject’s head, and it is typically positioned behind the subject.
Benefits of using Hollywood lighting:
It creates a high contrast that can be very dramatic or romantic.
It can be used to flatter most subjects.
It is a versatile lighting style that can be used to create a variety of looks.
Drawbacks of using Hollywood lighting:
It can be unflattering for some people, especially those with round or chubby faces.
It can be difficult to use in outdoor settings, as the light source may be too harsh.
It can be difficult to use with multiple subjects, as the shadows may not fall in the same place on each person.
Butterfly lighting

Butterfly lighting is a lighting pattern used in portrait photography where the key light is placed above and pointing down on the subject’s face. This creates a dramatic shadow under the nose and chin that looks like a butterfly. It’s also called ‘Paramount lighting,’ named for the Hollywood studio and how they lit their most glamorous and beautiful actresses.
To setup butterfly lighting the subject should be facing the camera and standing in front of a plain background.
Place the key light above and slightly in front of the subject. The light should be angled so that it casts a shadow under the nose and chin. A reflector can be used to bounce light back onto the shadow side of the face.
Add a fill light to the opposite side of the face to soften the shadows.
Adjust the settings on your camera until you are happy with the exposure.
Benefits of butterfly lighting:
It creates a flattering look. The shadows under the nose and chin help to slim the face and create a more symmetrical look.
It is a versatile lighting pattern. It can be used for both men and women, and it can be adapted to different types of portraits.
It is easy to set up. You only need one or two lights to achieve this lighting pattern.
Drawbacks of butterfly lighting:
It can be unflattering for some people. If the shadows are too harsh, they can make the face look gaunt or tired.
It can be difficult to use in outdoor settings. The sun can create harsh shadows that are difficult to control.
It can be boring if used too often. It is a good idea to mix up your lighting patterns to keep your portraits interesting.
Conclusion
In the world of studio photography, the importance of illuminating the subject correctly cannot be overstated. Proper lighting techniques go beyond simply brightening the space; they enhance the visual impact, evoke emotions, and ensure consistency and professionalism. By skilfully manipulating light sources, angles, and intensities, we can bring out the true essence of the subject, emphasize details, and create a compelling visual experience for viewers.
It is a good idea to explore the art of lighting, experiment with different techniques, and continually refine our skills. By understanding and harnessing the power of proper illumination, we can elevate their work to new heights, capturing extraordinary moments and leaving a lasting impression on our audience.